• Welcome to H4O! For a reduced ad experience, please login or register with the forum.

FJ4overland

SuperBuickGuy

Well-Known Member
Messages
3,403
Location
Woodinville, WA
first job tonight... geyser hole


still have to locate the transfer case shifter - but I've got some concerns so until I figure those out, they stay uncut

onto these

the line represents the wheel tub


5" of travel, 7" of clearance


I haven't decided how to attach them yet - I think I'm going to weld them on because those can be a jack point for the high lift


and I took the coating off the top, I'll paint the flare body color to the seam


other side done too
 

SuperBuickGuy

Well-Known Member
Messages
3,403
Location
Woodinville, WA
back to the main project
I have these sitting around... I may just have to use them on this one. Their only downside is they're manual rather than power brake - which I can adapt, but we'll see.


which leads me to an issue that I'm going to solve.... foot well space. I know Toyota had to fit what went in there, but their problem isn't mine.
the cover is about 2x too large

notice the amazing amount of room... no one buys a car because it has huge access for the transmission...

I know it seems like a lot of work - but I'm taking 2" out of the cover, and adding it to the floor space. I'm also going to take most of the dip out of the firewall so that I can put a heater behind the dash then smooth the firewall out on the engine compartment...all for a working defroster, I may use vintage air but without the a/c

that will also give me another 2" for my feet
I bolted the flares on

not sure, still, whether or not I'm going to weld them on (probably), but for now, they're in place

I also fixed the t-case shifter


SuperBuickGuy

Well-Known Member
Messages
3,403
Location
Woodinville, WA
If you've been following along on Project Binky, you'll understand this quip... not the grinder!
https://www.youtube.com/watch?v=7hCPODjJO7s
yes, the grinder


Nice cover, I've seen people fix these things... I simply cut them up

hopefully not for scrap.

nice floor, eh? all the rust welded up...

what the bloody hell? the cover doesn't fit anymore
 

SuperBuickGuy

Well-Known Member
Messages
3,403
Location
Woodinville, WA
hole filling time


I knocked the brace off the floor pan, then welded it back in place - I'll brace the tunnel underneath when I pull the body off the frame (as well as fix the top of the tunnel


so there it is


it's amazing what 2" will do for foot room
 

SuperBuickGuy

Well-Known Member
Messages
3,403
Location
Woodinville, WA
spent part of the day at the wrecking yard - still don't know what I'm going to do for seating.... maybe I should just steal the seat out of my S10 pickup, put the "racing" seats in the S10, not like it'd make any difference... hmm


got a wiring harness for the EFI - what a pain, thanks Regis!


and now it's time to take it apart to weld it up


​I'd have had the body off tonight, but one bolt... always one blasted bolt...
 

RamRod

Well-Known Member
Messages
3,914
Location
AB, Canada
I had one bolt stump me for about two weeks when I was trying to install a BL on my old Xtrerra (cira 2008) the 9 other mounting bolts gave me zero problems at all.... the last one might as well have been welded into place!!

There is always one
 

SuperBuickGuy

Well-Known Member
Messages
3,403
Location
Woodinville, WA
I'm no longer stumped by it ;)
Time to roll the '40 off to the side for a week or two. I am waiting on the other 2 points of the 6 point roll cage and the coil overs - but more importantly the cage because I don't want the body to fold up when I pull it off

but still a bit accomplished beside the shop shuffle
stripped head


weld a nut on


nope
sawzall

rolled it outside to give it a taste of fresh air - just to let it know there is a destination in mind for it


SuperBuickGuy

Well-Known Member
Messages
3,403
Location
Woodinville, WA
Nice. Sort of amazing how much the ole FJ looks like a CJ with half of the body missing.

almost like the stole the idea :giggle:

that said, I always say the FJ is what people build their Jeeps to be. Boxed frame, tougher body, 3/4 ton axles, chevy motor... of course, for me that simply not good enough :shame:

though it strikes me funny to think about putting a Jeep nose on it - but no, I don't want the heep to rub off on it.
 

SuperBuickGuy

Well-Known Member
Messages
3,403
Location
Woodinville, WA
I POR 15'd the gas tank. I plan on coating the inside as well, though I'm not sure what product I'm going to use. There's also a large part of me that thinks I should do even more floorboard work and put the tank under the floor along with a custom tank... I honestly don't know yet whether that will happen - the other choice would be to box the area above the tank so that it is sealed to the outside. In any case, by lining and coating the tank it will be substantially more safe than it was when I got it.


SuperBuickGuy

Well-Known Member
Messages
3,403
Location
Woodinville, WA
a bit more work, I had to take a stop and look at the Seften - I think I'm going to sell it - the last week, twice, I needed to tow my Bobcat and can't with anything I have now...

anyway, it's just more money for parts for this
I've now welded as much as I can weld before taking the body off (waiting patiently for Metal fab...)


finished grinding then stripped the cover


and worked on brackets for the fenders


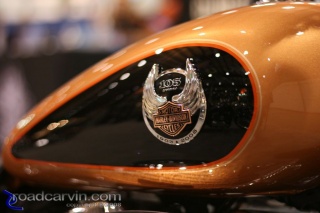
and getting an idea of paint colors... still thinking of the Harley color...
 

SuperBuickGuy

Well-Known Member
Messages
3,403
Location
Woodinville, WA
I'm not a fan of yellow - it's like telling the world you have a lemon. It's going to be in that color range (the mustard), maybe darker
2007%20IMS%20San%20Mateo%20Harley-Davidson%20Sportster%20Tank%20close-up%20IMG_6519.img_assist_custom.jpg


but now I'm second guessing and wondering if it will be too much brown. The top will be white, I don't like cooking inside.
 

derian06

Red Rockett
Messages
1,866
Location
Madison, AL
I'm not a fan of yellow - it's like telling the world you have a lemon. It's going to be in that color range (the mustard), maybe darker
2007%20IMS%20San%20Mateo%20Harley-Davidson%20Sportster%20Tank%20close-up%20IMG_6519.img_assist_custom.jpg


but now I'm second guessing and wondering if it will be too much brown. The top will be white, I don't like cooking inside.

I was thinking the exact same color with black fenders.
 

SuperBuickGuy

Well-Known Member
Messages
3,403
Location
Woodinville, WA
I'm going to go with a matte finish - but I think that color would be perfect... kind of a nod to the original LC colors and fitting within what is my '40 colors.... I've had 8 FJ40s, 6 tan, 2 blue. I thought I was getting away from that with this red one, but no, only the outside is red, it used to be tan lol
 

SuperBuickGuy

Well-Known Member
Messages
3,403
Location
Woodinville, WA
POR-15, great stuff, but not UV stable. To weld after is a pain, not sprayable (yeah, I know others have had success, but with this one I didn't have any success other than to be spotted black for a month).
Eastwood - UV stable, but not as tough as POR-15 since it's basically just enamel, sprayable. Because it's just paint, welding on the frame later wouldn't be a big deal

KBS paint, POR-15 tough and UV stable, sprayable, same weld issues as POR 15
Magnet paint - POR-15 tough, not UV stable, sprayable, but comes in a huge array of colors, same weld issues as POR 15


okay, so that's my research - thoughts? Frame painting my FJ-40, so sunlight will hit it. Magnet paint makes the comment that if sunlight does hit it, the black turns to a pewter color (which, I'm not sure, would be a bad thing).
 

SuperBuickGuy

Well-Known Member
Messages
3,403
Location
Woodinville, WA
Installed the new springs


and they may be wrong, I ordered them with a 4" compression and 8" drop for a total of 14 inches (plus one inch on either end for safety sake). I think they reversed those numbers


and with a 4" lift spring in back


it's not I couldn't run it 4" taller, I actually designed it so I had some flexibilty; but the taller it is, the less stable it is. Fortunately, it's just a spring issue so I can swap springs for free to dial in the ride height (which, actually is the reason I went with filthy motorsports)... need to call them anyway to get rear shocks... that is if metal tech calls me back with a status on my front roll cage. Don't know what's happening with them...

and I worked on the box
 

SuperBuickGuy

Well-Known Member
Messages
3,403
Location
Woodinville, WA
well, the news is I get the cage tomorrow... so tonight was a bunch of minor tasks
I needed to finish the hole for the shifter. My first FJ40 had its shifter in the location about where this one is; and it has this really neat trick - if you went through a puddle, you'd have a geyser through that hole.... which was pretty funny when one of my friends was riding with me, however, a cute girl that I took on a date didn't find it amusing at all. Personally, I thought it was pretty cool how they would get drenched and not a drop would get on me - I attribute their dislike to their misunderstanding of how cool physics is.


so I have fixed the hole and once a rubber boot is on the shifters, all will be good


I fixed a hole I created in fitting the transfer case


with paint


so the holes are plugged and I could spend more quality time on the box... looks the same? believe it or not it's completely moved - still not happy with the location and I'm questioning whether or not it's going to give me too tall of a riding position


gratuitous shot of the front suspension


first of the permanent steering mounts - stainless tube is probably overkill, but it's what I had in 2" ID pipe.
 

SuperBuickGuy

Well-Known Member
Messages
3,403
Location
Woodinville, WA
the suspension is at least 5" higher than it will be when done... there was a slight misunderstanding on what I wanted with the coil overs. That said, there shouldn't be any bumpsteer because the steering arm is parallel with the panhard bar (and within an inch in length). Of course, I must underline that the suspension, where it is now, is within 3" of its maximum downward travel.... once it gets back up where it belongs, the radius of the panhard bar is nearly at the center....

I didn't give up on the high-steer, but this (presuming it works) creates less issues.
 
Last edited:
Top